IPv4 Note:
IPv4 on Starlink is unusable for hosting because of carrier-grade NAT (CGNAT). You’re behind two layers of NAT. Your device gets a normal private IP (e.g. 192.168.0.0/24), and Starlink assigns your router a second private IP (e.g. 10.64.0.0/10) instead of a real public IPv4 address.
Starlink does this because there aren’t enough public IPv4 addresses to give every customer. CGNAT lets them stretch a single public IPv4 address across many users.
The good news is that Starlink fully supports IPv6. With IPv6, there’s no NAT, no port forwarding, and every device on your network can have its own public IP address. That means you can self-host services.
Before you begin:
The Starlink router is limited and lacks advanced features, so I put it in Bypass Mode and use the UniFi Express 7 as my main router. The LAN port of the Starlink router connects directly to the WAN port on the UniFi Express 7. This tutorial is based on that setup, so adjust the steps as needed for your own router.
At the time of this writing, I’m using UniFi Network 9.5 for the GUI. The router GUI might change over time so adjust as needed.
Starlink gives you two public IPv6 networks:
- A /64 for the WAN: This is for the router’s external side. If you use Bypass Mode your third-party router assigns this on its WAN port.
- A /56 for the LAN: Your internal IPv6 range. You can break it into 256 separate /64 subnets for your home network.
Below are Wireshark captures between my Starlink router and UniFi Router. These packets are sent using IPv6 multicast addresses.
Let’s look at how we get the /64. This prefix (subnet) is delivered by an ICMPv6 Router Advertisement. Your router then uses SLAAC to build it’s host IPv6 address based on its MAC.
Packet Capture:

ICMPv6 Router Advertisement

ICMPv6 Option (Prefix information : 2406:2d40:4000:186b::/64)
    Type: Prefix information (3)
    Prefix Length: 64
    Reserved
    Prefix: 2406:2d40:4000:186b::
Let’s take a look at how we get the /56. This prefix is delivered through a DHCPv6 Prefix Delegation Reply. Rather than giving you one /64, they delegate a /56. Your router can then break this into 256 /64 subnets for your home.
Packet Capture:

DHCPv6 Reply

DHCPv6
    Identity Association for Prefix Delegation
        IA Prefix
            Option: IA Prefix (26)
            Prefix length: 56
            Prefix address: 2406:2d40:400b:cd00::
UniFi Express 7 Router Setup
Step 1: Site Manager > Site > Settings > Internet > Select WAN > IPv6 Configuration
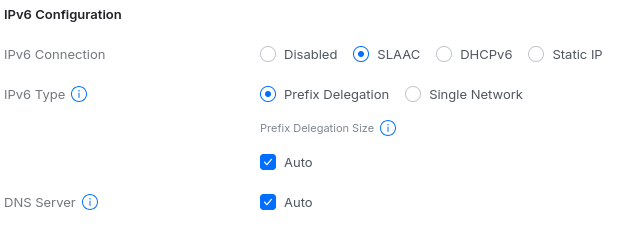
DHCPv6 Prefix Delegation works with either SLAAC or DHCPv6. I use SLAAC so the router can also generate a WAN address from the /64 advertised in the ICMPv6 RA.
You can set the PD size to /56 if you have problems, though the ICMPv6 RA already specifies it.
Step 2: Now that we have IPv6 enabled for the WAN side, let’s setup the LAN side.
Site Manager > Site > Settings > Networks > Select LAN > Protocol IPv6
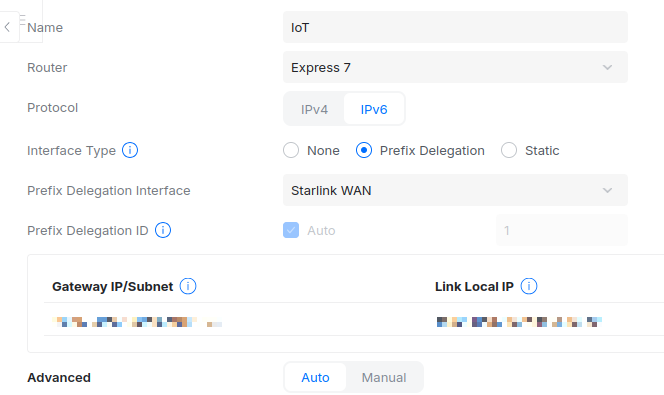
Go to your private LAN networks and enable IPv6 PD. Set the PD interface to your WAN, since that’s where the DHCPv6 Prefix Delegation is received from. The router takes the /56 and assigns each LAN a /64, starting at 00 and incrementing for each new network. You can’t customize these yet, but UniFi plans to add that in a future release.
- Delegated prefix 2406:2d40:400b:cd00::/56
- Each network:
- 2406:2d40:400b:cd00::/64
- 2406:2d40:400b:cd01::64
- 2406:2d40:400b:cd02::/64
- …
That’s it. Your router gets a public IPv6 address, and every LAN gets its own public /64.
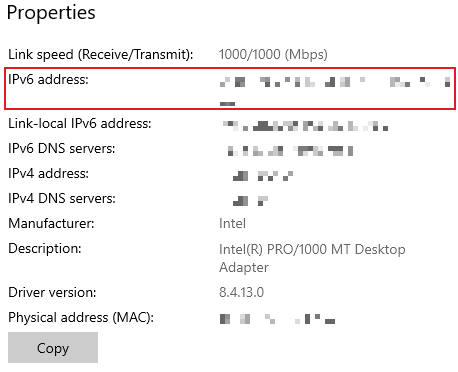
Below is a screenshot of my Windows 10 network settings. You can see that my computer has a public IPv6 address. This is the address I would use if I wanted to reach this machine from anywhere in the world. The only remaining step is to adjust the firewall rules on my router.
UniFi Express 7 Router Firewall
Since each subnet has its own public IPv6 network and devices use SLAAC to generate their own public addresses, every device becomes globally reachable. This makes your firewall the only line of defense.
Site Manager > Site > Settings > Policy Engine > Traffic & Firewall Rules > Internet v6 rules
Below are the default rules for IPv6 traffic from the Internet to your LAN.
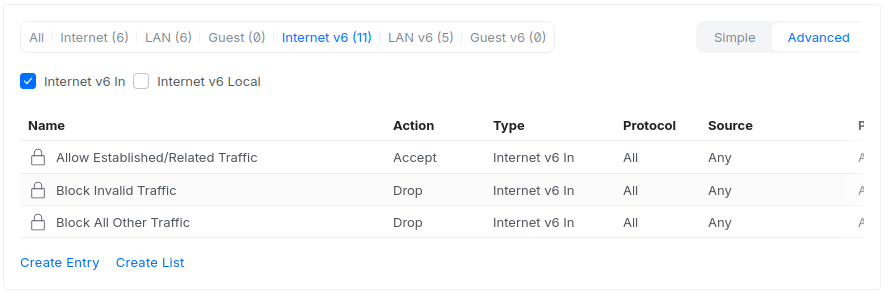
By default, only established traffic that originates from your network is allowed back in. To let the internet reach a specific device, we need to create an explicit rule for it.
Here I’m using the older firewall that applies rules per interface and direction. If you’re using the newer zone-based firewall, you’ll need to adjust accordingly.
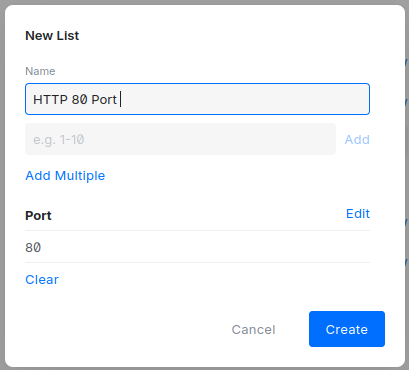
Click on Create Entry. Here I’m allowing port 80 for one IPv6 address. Just give the firewall rule a name and specify the destination port and IP.
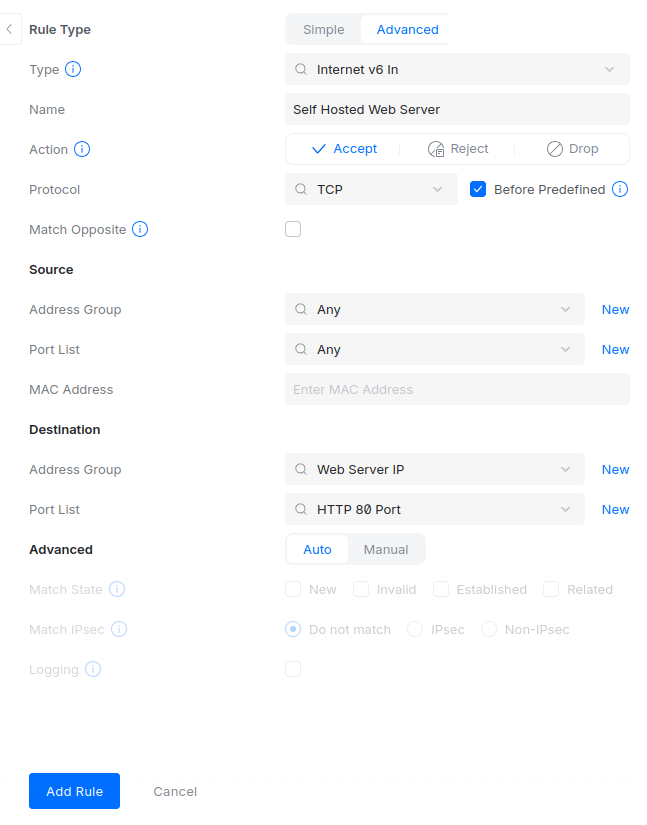
You’ll need to create a network list for these entries. A network list is basically an object you create that holds IP addresses or port numbers. Instead of typing the same IP or port into multiple firewall rules, you put it into a network list once and then reference it in your rules. It keeps everything organized and prevents duplicate entries.
Create a new address group list and port list. Give it any name you want. The important part is the IP address or port you put inside it.
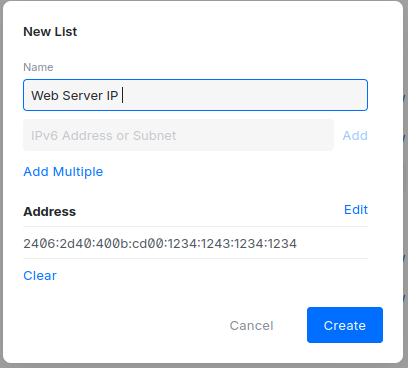
Add whichever device you want to make accessible from the internet in this rule. You can allow all traffic or only specific ports. The choice is yours.
Note that the addresses in the screenshot are examples only. Your IPv6 addresses will be different. I’m using placeholder values for privacy.
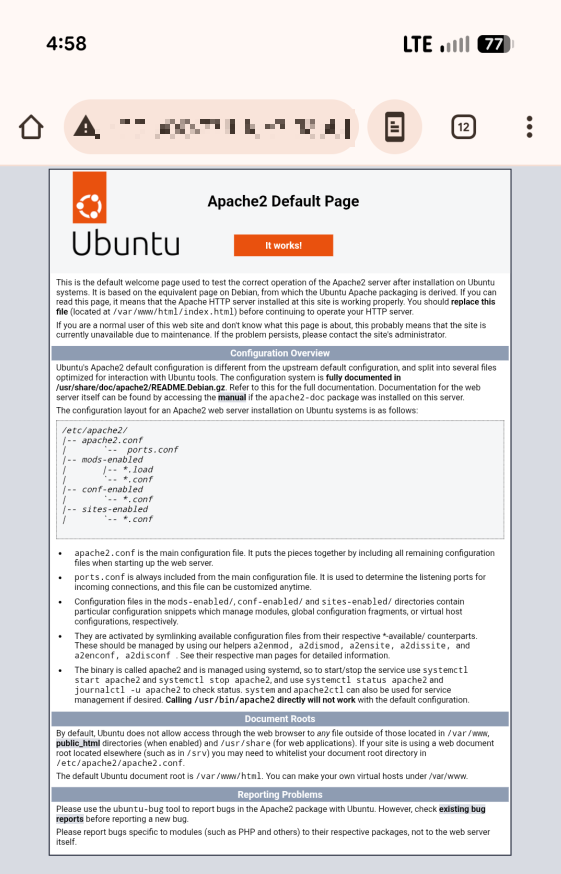
I’m not showing it here, but I already set up a web server that uses the IPv6 address from the example.
Testing the website
I’m using my LTE smartphone so the traffic comes from outside my network. To reach the site, enter the IPv6 address in your browser, but place it in brackets. IPv6 addresses contain colons, so the brackets tell the browser where the address stops and the port begins.
Example: [2406:2d40:400b:cd00:1234:1234:1234:1243]:80
Success!
Leave a Reply