DSM’s TCP Stack Is Limiting Your Remote Access Speed#
The Problem#
DSM uses CUBIC, Linux’s default TCP congestion algorithm. CUBIC treats dropped packets as a congestion signal and cuts its send rate hard. Packet loss on normal internet connections triggers this constantly, so CUBIC oscillates: brake, ramp up, brake again. The result is a connection sitting at a fraction of what your bandwidth can deliver. This is a kernel-level limitation. No amount of DSM tuning fixes it.
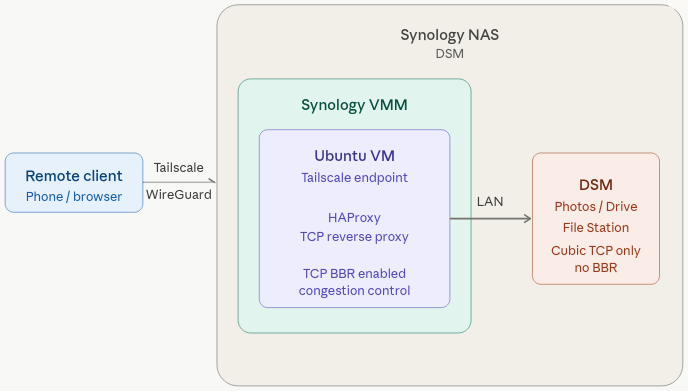
The workaround is a Linux VM on your LAN that runs BBR and proxies remote connections. BBR measures actual throughput instead of reacting to drops, so it doesn’t back off on normal packet loss. HAProxy splits the connection in two: one TCP session with the remote client over the internet, and a separate session to the NAS over the LAN. The NAS never deals with the internet directly. Tailscale provides the encrypted tunnel from your remote device to the VM.
| Component | Role |
|---|---|
| Tailscale | Encrypted WireGuard tunnel from your remote device to the VM |
| BBR | Handles the internet-facing TCP connection without backing off on packet loss |
| HAProxy | Splits the connection, isolating CUBIC to the local network where it belongs |
The VM can live anywhere on your LAN. I run mine in Synology’s Virtual Machine Manager. Install Ubuntu Server, then continue below.
Ubuntu Install Setup#
Prerequisites#
- A Linux machine on your home network (spare PC, Raspberry Pi, or VM)
- SSH access to it
- Your NAS’s local IP (DSM → Control Panel → Network)
Step 1 — Enable BBR#
echo "net.ipv4.tcp_congestion_control=bbr" | sudo tee -a /etc/sysctl.conf
sudo sysctl -p
sudo reboot now
Verify:
sysctl net.ipv4.tcp_congestion_control
# Expected: net.ipv4.tcp_congestion_control = bbr
Step 2 — Install Tailscale#
curl -fsSL https://tailscale.com/install.sh | sh
sudo tailscale up
Authenticate via the printed link, then install Tailscale on your remote device from tailscale.com using the same account.
Step 3 — Configure HAProxy#
sudo apt install haproxy -y
sudo nano /etc/haproxy/haproxy.cfg
Add to the bottom, replacing YOUR_NAS_LAN_IP with your NAS’s local IP:
frontend synology_gate
    bind *:5000
    mode tcp
    timeout client 1h
    default_backend synology_nas

backend synology_nas
    mode tcp
    timeout server 1h
    server nas YOUR_NAS_LAN_IP:5000 check
sudo systemctl restart haproxy
sudo systemctl enable haproxyConnect Your Device#
Install Tailscale on the device you want to connect from (phone, laptop, etc.). Once it’s connected to your tailnet, open the Tailscale app and copy the MagicDNS hostname of your Proxy VM. It will look like:
<machine-name>.<tailnet-name>.ts.netNow download the Synology app you want to use, such as Synology Photos or Synology Drive. You can also skip the app and open a web browser instead.
When you open the app for the first time, you will see three fields. Address or QuickConnect ID, Account, and Password. In the Address field, paste the MagicDNS hostname of your Proxy VM. For Account and Password, use your normal Synology NAS credentials. If you are using a web browser instead of an app, type the same MagicDNS hostname into the address bar and you will land on the DSM login page.
Leave HTTPS unchecked. Tailscale already encrypts everything end-to-end with WireGuard, so layering TLS on top adds overhead without adding security.
Here is the key idea. As far as the app is concerned, the Proxy VM is your NAS. Connections hit the VM on the standard Synology ports and get forwarded transparently to the real NAS behind it. The app never knows the difference. That is what a reverse proxy does. It sits in the middle, accepts connections on behalf of something else, and passes them through.
Throughput should approach the slower end of the connection: upload on one side, download on the other.
Notes#
Multiple services — Port 5000 covers DSM, Drive, and Photos. Add a frontend/backend block for each additional port. Full port list →
Tailscale relay fallback — If Tailscale can’t establish a direct connection it falls back to a relay, which tanks your throughput. A nearby cloud VPS running Tailscale avoids this. Check bandwidth limits on low-tier plans. More →
VMM auto-start — If the VM runs on the NAS via VMM, enable auto-start so remote access survives a reboot.
Synology BBR roadmap — Synology’s development team is evaluating BBR for a future DSM release. No timeline confirmed.